Within the duration of making my animation there have been difficulties overall but I have enjoyed making the video. I started by filming the shots on castle hill of brooke. I then imported the footage into photoshop (the parts that I wanted rotoscoped) and broke down the frames to up to 15 frames per second. I then drew over each frame using bright colours to show the difference between realism and cartoon. After I did this for all of the frames i wanted rotoscoped I put them into premier. I also used un-edited footage to combine within the sequence to show the audience what was really happening.
I put all the footage into a folder named "animation" and labeled each piece of footage. I imported all of this footage into premier.
I started in premier by putting the sound track "Explosions, cover Annushka Sims" underneath. I then saw that this gave me 2 minutes and 15 seconds. This was how much time I had to be able to piece the footage together. I wanted my video to start with long shots up to 5 seconds so i placed each shot on the timeline and used mild techniques such as putting a clip on top of another and dropping the opacity of the top clip so that the underneath clip is also seen behind. This gives the audience an impression that it is a dream as it is not realistic.
I also used still images that I had pre-rotoscoped. I did these just in case I didn't have enough successful footage. Although I did have enough film I still wanted to include these images within the video. I thought the best way to include them within my piece was to flash each image and intertwine each of the images when there was an instrumental to illustrate that the lyrics had stopped. This worked very well and showed an array of pictures which was exciting as apposed to seeing another long video which could become boring for the audience.
When all of my footage was placed on the timeline in the correct position, I then began to colour correct. I put RGB curves on each clip and moved the red, green, blue and white lines to which fitted best. I decided that I wanted most of my footage to be sepia and sun set colour so I did this to fit the theme.
Overall I think that my music video animation is very successfull. The only things I would change is that i would neaten up the time in which the frames cut. I think that when each clip cuts between each other should be more precise so that it fits the music perfectly.
Wednesday, 10 June 2015


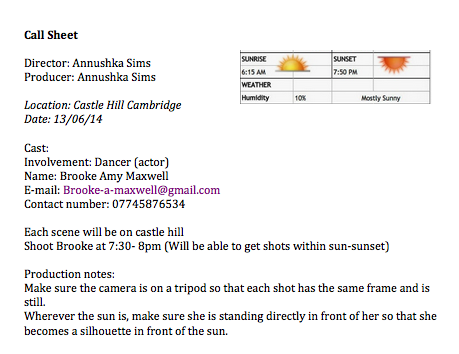
process and equipment
When filming we will be using a DSLR camera to film the shoot. I will start with brooke turning towards the camera and when you see her face she will start to be animated as she walks towards the camera.
When we have all of the footage we will transfer it onto the laptop and rename all of the footage. When the footage is all renamed I will transfers it into a premiere sequence. This will be cut up so all of the footage is in order and fits well with good continuity. Therefore, we can export the clips one by one and rotoscope them using photoshop.
In photoshop we will cut the frame rate down to every around 8 frames per second. We will then begin rotoscoping the frames using a graphics tablet to make sure that it's neat.
A problem that occurred was the fact that when it came to filming we hadn't charged the battery of the camera very much so we filmed half of our footage and then the camera died. When the battery had charged up again the sun had gone in which mean the natural lighting that we were using to help with our video had changed. I then had to redo all of our footage again to make sure that the continuity was good enough.
A problem that occurred was the fact that when it came to filming we hadn't charged the battery of the camera very much so we filmed half of our footage and then the camera died. When the battery had charged up again the sun had gone in which mean the natural lighting that we were using to help with our video had changed. I then had to redo all of our footage again to make sure that the continuity was good enough.


Animation Tests
In order to be able to rotoscope moving images I decided to start testing how I will be able to achieve this I need to rotoscope still images to be able to get used to being able to do this.


For this picture I used a cannon dslr. I put it into photoshop by locking the picture and putting 2 layers above, sketch and colour. By having the colour underneath the outline this means that it makes colouring easier so you can colour underneath the lines rather then having to try and colour around them.
I then started to rotoscope moving images. I used a cannon dslr to film me smoking. I imported the video into photo shop and cut it to 3 frames. I drew over each frame and played them. This is the giff I ended up with....

I like this piece because you can see the change of colours within the face, hair and coat. Although it is not accurate I prefer this to if it was extremely precise . I have decided I want all my animation to be like this.
Tuesday, 9 June 2015


Subscribe to:
Comments (Atom)